Water heater maintenance is the eighth article in our series of top 10 home maintenance tips. These tips are based on our experience from inspecting homes in Tucson where we see certain issues on a regular basis. Issues that could have been prevented with some easy and affordable proactive maintenance. Proactive home maintenance helps prevent unpleasant surprises and major damage, and keeps maintenance and repair costs down. We hope you find these tips helpful and use them to keep your home in good shape.
Water heater maintenance
Our eighth home maintenance tip is all about water heater maintenance. You know, that big ugly grey thing in the corner of your garage, laundry room, or closet that you never look at? Its function is pretty basic: provide hot water to all faucets in the house. As long as there is hot water, nobody ever gives a second thought to this appliance. However, water heaters do require maintenance to ensure they do what they are supposed to and last as long as possible.
Tank vs. tankless water heaters
There are two main types of water heaters: tank and tankless. The traditional tank water heater has a tank that stores water. Typical tank sizes are 40 or 50 gallons for a normal single family home. They use either gas or electricity to heat that water to a certain temperature so that it is ready for use when needed.
As the name implies, tankless water heaters do not have a tank and do not store water. Instead, they will heat water only when you request it by turning on a faucet. They heat the water instantly as it passes through it on the way to where you need it.
Most of this article focuses on the traditional tank water heater because they are the most common type. At the end of this article, we will briefly touch on tankless water heaters as well.
Check the water shut-off valve
A water heater usually has a shut-off valve at the water pipe that feeds cold water into the water heater. The purpose of the shut-off valve is to stop water from flowing into the water heater. This is important for water heater maintenance. More importantly, though, you need a way to turn off the water if the water heater is old and developed a leak. This limits the amount of water that can leak out.
You can find the shut-off valve usually right above the water heater at one of the two water lines connecting to it (usually the right one). Look for something that looks like a wheel or a lever.
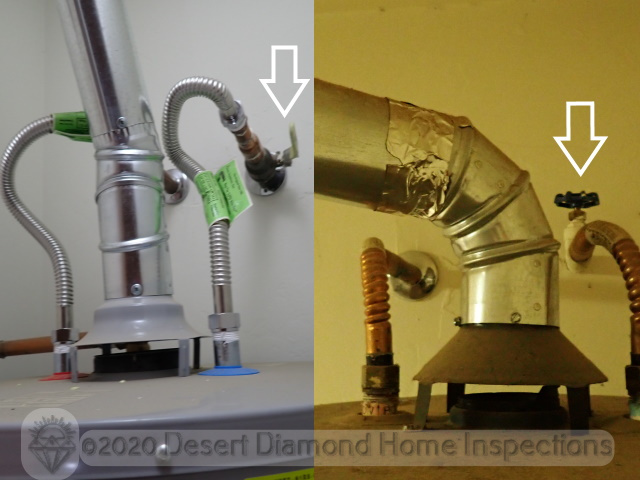
The shut-off valve with the lever on the left is a quarter-turn ball valve. The shut-off valve with the wheel on the right is a gate valve.
If your water heater is electric, this looks exactly the same, except there is no vent pipe sticking out the top like in the photo.
Caution: If you have a gas water heater, the vent pipe on top of the water heater can get very hot. Exercise caution and do not accidentally touch the vent pipe to avoid burns!
Caution: Gate valves are notorious for getting stuck when not used for a while. Furthermore, they also tend to break and leak due to age and lack of use. Therefore, do not force this type of shut-off valve to avoid an unpleasant surprise.
Checking a quarter-turn ball valve
Grab the lever and slowly turn it in a clockwise direction for 90 degrees until the lever is perpendicular to the water pipe. Then slowly turn it back in a counterclockwise direction until it it parallel with the water pipe again. Use only a reasonable amount of effort and do not force it.
If the lever only turns part of the way or not at all, or if the valve starts leaking, call a plumber so they can replace it.
Checking a gate valve
Grab the wheel and slowly start turning it in a clockwise direction. Be gentle! If it does not turn easily, or if it starts leaking, stop!
It should take only five to ten turns to close the valve. If it keeps turning endlessly, the valve is probably broken and needs replacement.
If it closes successfully, slowly turn it back in a counterclockwise direction until it is fully open again.
Did your gate shut-off valve pass the test? Congratulations! However, you should still consider replacing it with a ball valve because it will fail eventually.
Check for leaks
If a water heater leaks, and this issue goes unnoticed for some time, it can cause major water damage to a home. Therefore it is very important to regularly check for leaks.
There are three spots to check…
Check the shut-off valve
As mentioned above, shut-off valves can fail and develop a leak. Carefully check the valve and its connections for any signs of leakage.
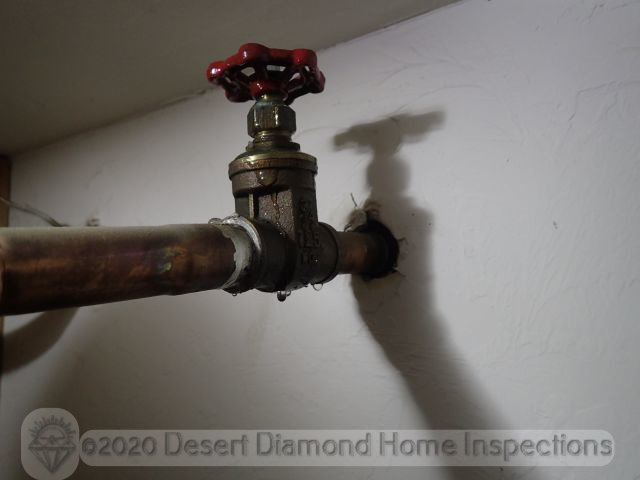
Look carefully. Can you spot the leak at the valve?
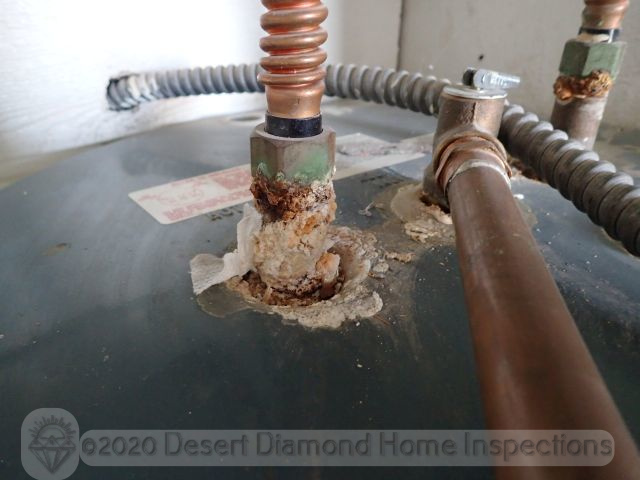
Check the connections
Another very common spot for leaks are the connections. By the way, a leak can show up in several different ways. The most obvious way, of course, is the presence of actual water. Then there is rust, a result of the presence of water over time. Lastly, there is mineral build-up. Here are some examples.
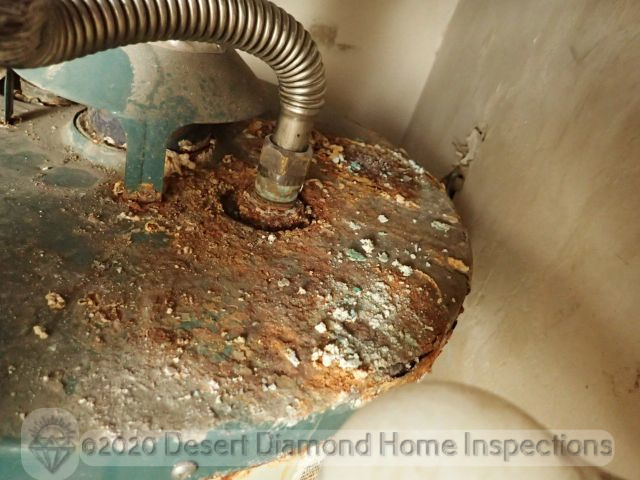
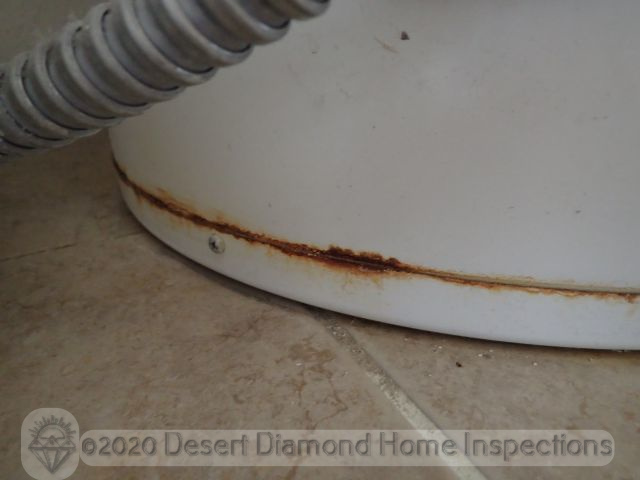
Check around the bottom
Finally, look around the bottom of the water heater. Look carefully, though, because the leak might not be obvious or in a spot that is hard to see. A flashlight can come in handy for this.
In addition to actual leakage, also look for signs of leakage such as rust. Often a spot of rust will give away the presence of a leak not visible otherwise. If you see rust at the bottom of the water heater, it is probably time to replace it.
Flush the tank
Have you ever walked past your water heater and heard it make this strange popping sound? Like it’s making popcorn instead of hot water? That’s a sign of mineral build-up in the tank.
We have very hard water in this region. Over time, this results in mineral build-up in the bottom of the water heater tank. This is bad because it decreases the life span of the tank and accelerates rusting/leaking. To prevent this from happening, you should flush the tank every year. A partial or full flush of the tank removes the accumulating crud and increases the lifespan of the tank.
- Turn off the power source of the water heater. For gas water heaters, turn the control knob to the Off position. For electric water heaters, turn off the breaker.
- Turn off the cold water supply valve for the water heater.
- Open a hot water faucet in your home.
- Connect a garden hose to the drain valve near the bottom of the water heater and route it to the outside.
- Open the drain valve and let the water heater drain completely.
- Turn on the cold water supply valve for the water heater.
- Run water through the tank and out the drain valve for several minutes.
- Close the drain valve and let the tank fill back up.
- Check the open hot water faucet. When water starts to come out, the tank is full.
- Turn on the power source for the water heater.
- Allow approximately one hour for the water to heat.
For more detailed instructions on how to flush the tank, refer to the manual for your specific model water heater, a qualified licensed plumber, or professional online instructional videos.
Install a pan
Old water heaters often rust through and start leaking out the bottom. If the leak goes undetected for some time, the leaking water can cause a lot of damage to your home that is expensive to repair. To prevent this, you can install a pan under the water heater to catch leaking water. The pan should have a drain line to the outside so it won’t overflow. As an added bonus, you can place a water detection device in the pan to be alerted when there is a leak.
For more tips and details on this topic, check out our article how to prevent water damage to your home.
Change the anode rod
Many tank water heaters have a metal rod inside the tank called an anode rod. The purpose of this rod is to slow down corrosion of the tank to extend its lifespan. In the process of doing so, the anode rod deteriorates over time. To extend the lifespan of the tank, you should replace the anode rod after five to six years.
Check the manual for your particular water heater model to see whether it has an anode rod, and if so, how to access and remove it. Usually it is accessible from the top of the water heater. Use a wrench to unscrew it and pull it out. You can buy replacement anode rods at the hardware store.
If there is not enough clearance above your water heater, this can get tricky. In this case, ask a qualified licensed plumber for assistance.
Tankless water heater maintenance
While tankless water heaters do not have a tank that can rust through, they still require maintenance. This includes checking shut-off valves and checking for leaks (as described above), as well as descaling. Descaling means removing the scale buildup inside the water heater that accumulates due to hard water.
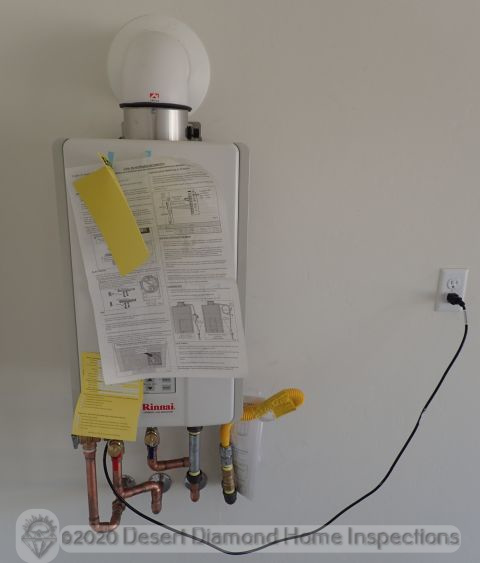

For instructions on how to descale a tankless water heater refer to your water heater manual, a qualified licensed plumber, or professional online instructional videos.
When
Put a reminder on your calendar to inspect the water heater twice a year, flush (or descale) it once a year, and replace the anode rod every five or six years.
Important tip: Always perform water heater maintenance during the week early in the day. Avoid doing this on a weekend or a holiday. If something goes wrong or results in a leak, you want to be able to get a plumber to come out quickly and fix it.
If you do not have a plumber on speed dial, click here to find a good plumber in the Tucson, AZ area.
Conclusion
Water heater maintenance is very important. It helps extend the lifespan of the water heater and can prevent or minimize leaks and water damage to your home. As always, read the manual for your specific water heater for more detailed information. Refer to a qualified licensed plumber if the tasks exceed your level of comfort and/or expertise.